
You’ll boost your gut health by selecting fresh, organic vegetables and using a 2-3% salt ratio for ideal lacto-fermentation. Keep vegetables fully submerged beneath the brine using weights, maintain temperatures between 65-75°F, and use sterilized glass containers. Start with small batches, combining diverse vegetables like carrots, radishes, and cucumbers for maximum probiotic benefits. Taste daily to monitor progress, then store finished ferments in cool, dark environments. Incorporate quarter-cup servings into meals gradually to support digestive adaptation and discover advanced techniques for perfecting this ancient preservation method.
Choose Fresh, High-Quality Vegetables for Optimal Fermentation

When initiating your wild fermentation journey, you’ll discover that selecting fresh vegetables forms the foundation of successful probiotic development. Fresh vegetables contain natural sugars and nutrients essential for fermentation to thrive, directly enhancing beneficial bacteria growth.
You should prioritize organic or locally sourced options to minimize pesticide residues that inhibit these vital microorganisms.
Look for vegetables with vibrant colors and firm textures—these indicators signal freshness and higher nutrient content, supporting healthier fermentation outcomes. Avoid overripe or damaged produce, as they harbor undesirable bacteria that’ll spoil your fermentation and compromise flavor.
Seasonal vegetables offer the best flavor profiles and nutrient density, making them ideal candidates for wild fermentation while maximizing your gut health benefits.
Maintain Proper Salt Ratios for Healthy Lacto-Fermentation
You’ll need to calculate the correct salt-to-vegetable weight ratio to create an environment where beneficial lactobacillus bacteria thrive while harmful microorganisms can’t survive.
Testing your brine concentration throughout the process guarantees you’re maintaining that critical 2-3% salt level that makes fermentation successful.
Consider adjusting your salt measurements based on your local climate, as warmer temperatures may require slightly higher concentrations to prevent spoilage.
Salt-to-Vegetable Weight Ratios
Getting the salt-to-vegetable ratio right forms the foundation of successful lacto-fermentation.
You’ll need to calculate precisely to create the ideal environment for beneficial bacteria while preventing harmful pathogens from taking hold.
For proper salt-to-vegetable weight ratios, follow these essential guidelines:
- Use 2% salt by weight – Calculate 2 grams of salt per 100 grams of vegetables
- Weigh accurately – Even small variations can greatly impact your fermentation process
- Scale proportionally – A 500-gram batch requires exactly 10 grams of salt
Too little salt invites spoilage and unwanted bacteria.
Too much salt inhibits fermentation entirely, preventing the development of those complex, tangy flavors you’re seeking.
Always measure your vegetables first, then calculate the exact salt amount needed for consistent, successful fermentation outcomes.
Testing Brine Concentration Levels
While establishing the correct salt percentage provides your foundation, testing brine concentration levels guarantees your fermentation stays on track throughout the entire process.
You’ll want to regularly taste your brine during fermentation to monitor salt levels. If it becomes excessively salty, you can dilute it with a small amount of water, but make sure your fermented vegetables remain completely submerged for best results.
For precise measurements, use hydrometers or salinity refractometers to accurately assess brine concentration. These tools make certain your fermentation process stays both effective and safe.
Remember that proper brine concentration prevents spoilage while promoting beneficial lactic acid bacteria growth. If your brine becomes too weak, harmful bacteria may develop, compromising your fermented vegetables’ safety and quality.
Adjusting Salt for Climate
Climate directly influences your fermentation’s salt requirements, making temperature-based adjustments vital for successful lacto-fermentation.
You’ll need to modify your standard 2% salt concentration based on your environment’s temperature conditions.
Here’s how to adjust for different climates:
- Warmer climates – Increase salt concentration slightly above 2% to slow rapid fermentation and prevent spoilage.
- Cooler climates – Use lower salt ratios to accommodate slower fermentation while developing complex flavors.
- Temperature fluctuations – Monitor your ferments more closely and taste regularly to catch any issues early.
Accurate salt measurement remains essential regardless of climate.
Insufficient salt invites harmful bacteria, while excessive amounts halt beneficial fermentation entirely.
Taste your vegetables throughout the process and adjust accordingly to maintain both safety and flavor balance.
Keep Vegetables Submerged Below the Brine Line
To guarantee successful wild fermentation, you must keep your vegetables completely submerged beneath the brine line throughout the entire process. Exposure to air invites mold growth and spoilage, ruining your fermented cabbage and other vegetables.
Use a clean weight—like a fermentation stone or clean rock—to press vegetables down into the brine. This creates the anaerobic environment essential for lacto-fermentation, which produces beneficial probiotics that support gut health.
Weighted vegetables create the oxygen-free environment needed for healthy lacto-fermentation and probiotic development.
Check your fermentation daily to confirm vegetables stay submerged. If they float above the brine, add salted water to cover them again. Properly submerged vegetables ferment evenly, developing better flavor while staying protected from harmful bacteria.
This simple step makes the difference between successful fermentation and spoiled vegetables.
Use Clean Equipment and Sterilized Jars

Clean equipment forms the foundation of successful wild fermentation, preventing harmful bacteria from contaminating your vegetables and compromising their probiotic benefits.
You’ll want to sanitize everything that comes into contact with your vegetables during preparation and storage.
Here’s what you need to clean thoroughly:
- Jars and containers – Boil glass jars for several minutes or run them through a hot dishwasher cycle
- Cutting tools – Wash and dry knives, cutting boards, and measuring spoons completely
- Storage vessels – Choose glass or food-grade plastic containers that won’t harbor bacteria
Your sterilized jars should be completely free from residues before adding vegetables.
Don’t forget to regularly inspect your fermentation containers for any signs of mold or contamination, discarding anything that appears compromised.
Monitor Temperature for Consistent Fermentation Results
Once your equipment is properly sanitized, temperature becomes your next critical factor for achieving consistently delicious fermented vegetables.
You’ll want to monitor temperature and maintain it between 65°F to 75°F (18°C to 24°C) for ideal results. This range promotes beneficial bacteria growth while preventing spoilage.
Warmer temperatures accelerate fermentation but can create overly sour flavors and mushy textures. Cooler environments slow the process, extending fermentation time and risking undesirable microbial growth.
Temperature extremes compromise your fermentation—too warm yields mushy, overly sour vegetables while too cool invites harmful bacteria growth.
Use a thermometer to track your fermentation environment and maintain stability for consistent fermentation results.
Fermentation typically takes several days to two weeks, depending on temperature. Check your vegetables regularly to monitor progress and achieve your desired taste and crunchiness.
Temperature control directly impacts your final product’s quality.
Test Taste and Texture Throughout the Fermentation Process
You’ll need to taste your fermenting vegetables every few days to track how their flavors evolve from fresh to tangy.
As fermentation progresses, you should notice the vegetables becoming softer while still maintaining a pleasant crunch.
These daily checks help you catch the perfect moment when your vegetables reach your desired level of sourness and texture.
Track Flavor Development Daily
While your vegetables bubble away in their brine, daily tastings become your most valuable tool for achieving perfect fermentation results.
You’ll notice significant changes in flavor development within the first few days, as mild vegetables transform into tangy, probiotic-rich foods that benefit your good gut health.
Track these key elements during daily tastings:
- Flavor progression – Initial mildness evolves into pronounced sour notes as lactobacillus bacteria multiply
- Texture maintenance – Vegetables should stay crisp; mushy texture indicates over-fermentation
- Personal preference timing – Document when flavors reach your ideal tanginess level
Always use clean utensils when tasting to prevent contamination.
Recording your daily observations helps you replicate successful batches and establish ideal fermentation timeframes for future vegetable preparations.
Texture Changes Signal Progress
Beyond monitoring flavor development, texture changes provide equally valuable insights into your fermentation’s progress. You’ll notice vegetables gradually soften as lactic acid breaks down cell walls, creating that perfect balance between tangy flavor and satisfying crispness. Test your vegetables every couple of days to prevent them from becoming overly mushy.
| Days | Texture | What It Means |
|---|---|---|
| 1-2 | Hard, raw crunch | Fermentation just beginning |
| 3-5 | Slight softening | Active bacterial transformation |
| 6+ | Crisp-tender | Ideal probiotic development |
If your vegetables remain too hard or lack sourness after several days, they’ll need more time. Watch for visual cues like bubbling brine and color changes—these confirm your fermentation is progressing beautifully toward probiotic-rich perfection.
Store Fermented Vegetables in Cool, Dark Environments
Once your vegetables have reached their desired level of fermentation, proper storage becomes vital for maintaining their quality and extending their shelf life.
Proper storage after fermentation is the critical final step that determines whether your probiotic-rich vegetables maintain their quality or deteriorate.
You’ll want to move your fermented vegetables to a cool, dark environment between 50°F to 60°F to slow down fermentation while preserving those beneficial probiotics.
Here’s how to enhance your storage conditions:
- Choose the right location – Use a pantry or basement with consistent temperatures to maintain ideal taste development.
- Block out light – Store in opaque containers or cover jars with cloth to prevent probiotic degradation.
- Monitor regularly – Check for excessive bubbling or off odors that signal over-fermentation.
Direct sunlight compromises nutritional value and vibrant color, so darkness is key for preserving quality.
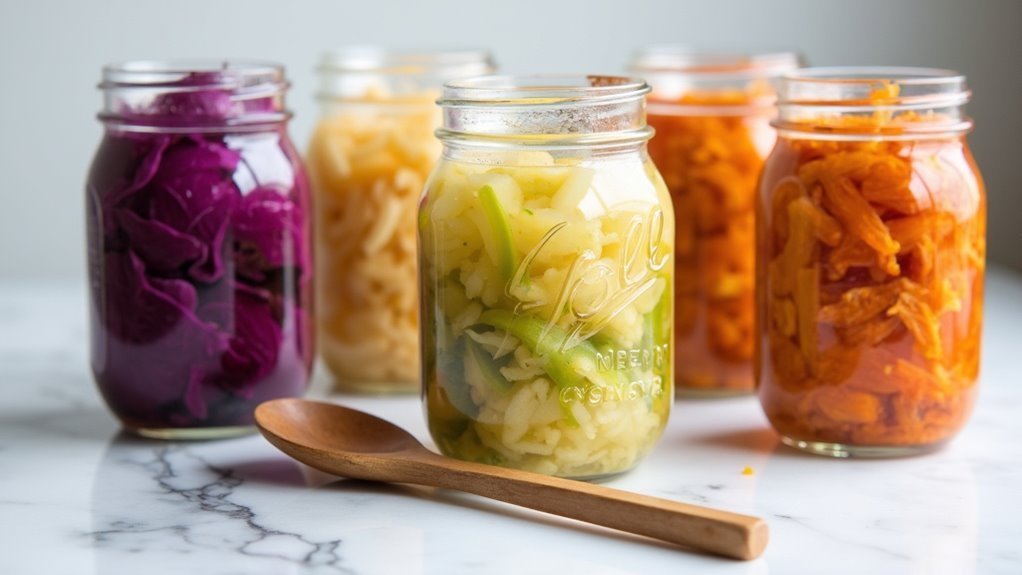
Incorporate Diverse Vegetable Combinations for Maximum Benefits
Since you’ve mastered proper storage techniques, you can now focus on maximizing your fermentation’s nutritional impact through strategic vegetable combinations. Incorporating diverse vegetables like carrots, cucumbers, and radishes enhances your gut microbiome by promoting probiotic diversity essential for peak digestion and immune function.
Choose seasonal, local vegetables to maximize nutrient content while supporting gut biodiversity. Experiment with anti-inflammatory spices like garlic and ginger to boost flavor profiles and deliver additional health benefits.
Combine nutrient-dense options like kale and beets through lacto-fermentation to increase vitamin and mineral bioavailability. Create a balanced mixture of cruciferous, root, and leafy vegetables for robust fermentation profiles.
This strategic approach supports gut health while enhancing both flavor and nutritional value in your fermented dishes.
Start With Small Batches to Perfect Your Technique
You’ll want to begin your fermentation journey with simple vegetable combinations like cabbage and carrot, using small 450g batches that won’t overwhelm you if something goes wrong.
Check your ferments daily by tasting and observing changes in color, texture, and smell to understand how the process unfolds.
These early attempts will teach you valuable lessons about timing, salt ratios, and environmental factors that you can’t learn from books alone.
Choose Simple Vegetable Combinations
Three simple vegetables—carrots, cucumbers, and radishes—make the perfect starting point for your wild fermentation journey.
These reliable vegetables ferment consistently and won’t overwhelm you with complex flavors while you’re learning the process.
Starting with basic combinations helps you master fermentation fundamentals before experimenting with challenging ingredients.
You’ll develop confidence understanding how different vegetables behave during fermentation and learn to recognize proper texture and flavor development.
Consider these beginner-friendly approaches:
- Single vegetable ferments – Focus on one type to understand its unique fermentation characteristics
- Two-ingredient combinations – Pair carrots with cucumbers or radishes with cucumbers for simple flavor profiles
- Classic trio – Combine all three vegetables for a traditional, balanced fermented foods blend
Master these simple vegetables first, then gradually introduce more adventurous ingredients to your fermentation repertoire.
Monitor Fermentation Progress Daily
How can you tell if your fermentation is progressing properly? Monitoring your wild fermented foods requires daily attention to visual and taste cues.
Check your fermentation jar daily to observe bubbles and color changes, which indicate active fermentation. You’ll notice the vegetables gradually developing their characteristic tangy flavor.
Taste your vegetables every couple of days to gauge sourness levels and ascertain they’re fermenting to your preference.
Keep your jar in a cool, dark place to prevent overheating that can disrupt the process.
Start with small batches to reduce waste and enable easier monitoring.
Document your observations and results from each batch, noting timing, temperature, and flavor development. This practice helps you refine your technique and achieve consistent, delicious fermented foods.
Learn From Early Mistakes
When starting your wild fermentation journey, embrace small batches as your greatest learning tool.
You’ll make mistakes—and there’s a good reason to welcome them early. Small quantities let you experiment without wasting precious ingredients or overwhelming yourself with failed attempts.
Your early fermented foods will teach you valuable lessons:
- Salt concentration matters: Start with 2% salt relative to vegetable weight to create the perfect environment for beneficial bacteria.
- Timing is everything: Small batches ferment faster, allowing you to taste and adjust flavor profiles more frequently.
- Documentation pays off: Record your process and outcomes to identify successful techniques for future larger batches.
Monitor your small experiments daily to prevent over-fermentation. Each mistake becomes a stepping stone toward mastering wild fermentation techniques.
Add Fermented Vegetables to Daily Meals for Gut Health Support
Since your gut houses trillions of microorganisms that directly impact your overall health, adding wild fermented vegetables to your daily meals becomes one of the most effective ways to support digestive wellness.
You can easily incorporate sauerkraut into breakfast omelets, add kimchi to grain bowls, or serve fermented pickles alongside sandwiches. These probiotic-rich foods enhance microbial diversity while delivering bold flavors that complement various dishes.
Aim for at least six servings weekly to markedly remodel your gut microbiota and reduce inflammation.
You’ll find that fermented vegetables naturally boost immune function and potentially lower chronic disease risks. Start small with quarter-cup portions and gradually increase as your digestive system adapts to the beneficial live cultures.
Frequently Asked Questions
How to Ferment Vegetables for Gut Health Naturally?
You’ll create a healthy gut environment by submerging chopped vegetables in 2% salt brine, keeping them weighted down, and fermenting at room temperature for 3-5 days before refrigerating.
What Is the Healthiest Vegetable to Ferment?
You’ll find cabbage is the healthiest vegetable to ferment. It’s packed with fiber and creates abundant probiotics when made into sauerkraut or kimchi, offering maximum gut health benefits.
Is It Okay to Eat Fermented Vegetables Every Day?
You can safely eat fermented vegetables daily. They’ll boost your gut health with beneficial probiotics, support digestion, and reduce inflammation. Start gradually to avoid digestive discomfort and choose naturally fermented options.
What Is the Best Fermented Food to Eat for Gut Health?
You’ll benefit most from yogurt and kefir since they’re packed with diverse probiotic strains. Kimchi’s also excellent for lactobacillus content. Don’t limit yourself to one—rotate between different fermented foods for maximum gut diversity.


Leave a Reply